Showing posts with label acrylic. Show all posts

Tuesday, October 14, 2014

Gelli good printing!

Still playing around with my Gelliarts Gelli plate. I bought some inexpensive doilies from a Dollar shop to use as masks and stencils. One of them was a light lacy thread one not plastic. But I thought it would be good as a stencil.

When I used it over the painted Gelli plate and tried to pull a print,  nothing came through the weave. The doily seemed to absorb the paint.  I was disappointed that it didn't work. There didn't look like there was much paint left on the plate, but I pulled a print to pick up what was left.

This was the fantastic result I got! The colour paint I used was Paynes Grey. When you look closely it looks like fabric, not a print on paper!

Sunday, October 12, 2014

Can I press you to a Gelli?

Having lots of fun experimenting with my Gelli plate.

Using the 'Gelli Plate Printing: Mixed-Media Monoprinting without a Press' book by Joan Bess, tried making my own printing plate with kids coloured foam sheets.

I used a wavy ruler to mark lines in various curves on the foam sheet then cut  them up using a blade. Some pieces I trimmed into short pieces and some I cut into small triangles.

Then using heavy cardboard as a backing plate I arranged them, fixing them with double-sided tape and glue for the tiny pieces.

To make it a bit more interesting I drew grooves into some strips with a pencil.

The Gelli plates were rolled with acrylic paints and the printing plates were pressed in to remove some areas of the paint. Prints were pulled from the Gelli as well as prints made with the paint on the printing plates.

This was very easy to do! The supplies were cheap kid's stationery foam, a wavy edged ruler, a blade, a pencil, double-sided tape and glue, and a piece of heavy cardboard.

So much fun! You should try it!

Tuesday, November 6, 2012

Hundertwasser influence


Been having fun playing with spraying backgrounds lately. Lots of spray acrylic paint colours over stencils and masks that were both found ojects and commercial stencils.

The hard part is trying to make some art on the top of the backgrounds. They already look like artworks and you don't know what to put on the top of them or even if you want to cover them up. But I know that you can't have a lovely complex artwork unless you let go a little and just work up the layers!

So I have shown you the stages of this page. I drew with black Pitt Artist pens and white Zigg pen, then coloured with Sharpies in red, yellow, blue and green.

Not sure if you recognise the influence for this piece ... it is Hundertwasser. The art journaling Yahoo Group "Blissfully Art Journaling" suggested the prompt to be influenced by Hundertwasser, and I rose to the challenge.

Enjoy and tell me about your recent art play!

Wednesday, October 3, 2012

Red Head


I had a lot of fun yesterday making art with some friends for a day. This art journal acrylic painting is the fruit of my pursuits!

Although I love mixed media, I realised when I went to describe this art page that it is actually pure acrylic paint. The background was done by laying objects on the page and spraying with watered down acrylic paint or liquid acrylic. Objects were also printed positively to use up the paint that was sprayed over them. Once the background dried more objects were layed down and sprayed over again. I tried this technique after doing Traci Bautista's Strathmore Art Workshop.

Then I used a pencil to draw a face over the top of the background and painted it in with acrylic paints.

Lots of fun! I was so pleased to finally use a background painting and paint something onto the top of it. I was never sure what to put on the top of these cool backgrounds. But I love the effect of the background texture coming through the foreground painting and giving it more interest.

I know I need to work on my face proportions a little more - I always make the eyes too big for the rest of the face. I also want to work on making the eyes on my faces more indistinct because they end up so clear and harsh looking - but practice makes perfect, so I will keep trying!

Keep making art guys!!!!

Tuesday, March 16, 2010

scott base acrylic painting


A recent painting I did as a gift for my Uncle who spent two terms down at Antarctica's Scott Base. This was my impressionistic and stylistic take on an aerial view of the base. Lots of fun to paint... I learned a lot as I painted it as well.

This was the original aerial photo that I used as inspiration for the artwork.

This was initial sketching using pencil, liquid graphite, white poster paint pen and green highlighter. The list was me trying to sort out the order of the layers in my head.

This was a big sketch of my painting layout to help guide the colours as I laid them down.

First layers were white gesso, then a bright layer of Phthalo Blue acrylic dropped into pools of water on the surface of the canvas. Then I lay on plastic film (glad wrap, cling film) to make patterns.
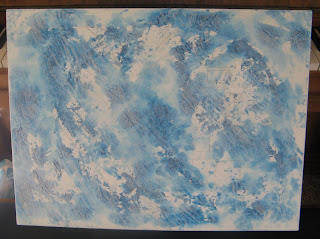
Next was a layer of white gesso all over the top, once again using the plastic wrap to add texture. I looked at lots of images of snow and ice and I really wanted to try and get that dazzling look of bright blue showing through white ice. I got a big mess in these early stages! Paint all over me!!

Needless to say there was even more mess when I started splattering dark acrylic paint over the top. The colour is a homemade version of Payne's Grey that I love to work with... Mars Black mixed with Phthalo Blue and Phthalo Turquiose. I concentrated the splatter in the are where the buildings would be because the camp appears to sit on a really dark looking gravel.
Of course I forgot to take photos at the next stages, but I used Phthalo Turquiose for the buildings, and my Payne's Grey for the shading and shadows, gesso for the highlights.


Part way through I wasn't sure if I was going to be happy enough to give the painting as a gift, and then it just came together, and I am pleased as Punch with the final outcome.

Must paint more! Very exhausting, but also therapeutic!!

Friday, July 3, 2009

lady macbeth


"Those whom the gods would destroy, they first make mad"
This is a collage journal page on black paper. The image is a vintage book clipping of Lady Macbeth.
I started the page with Naples Yellow acrylic paint, then crackled over purple paint with a crackle medium. I glued torn pieces of serviette around the outside edge and glued the Lady Macbeth in the centre. The border was drawn with Sakura glaze pen and black Sharpie. So was the text. I just made up the font as I wrote it because I didn't want to use computer font (I am trying to do more of my own lettering! Man, do I need to loosen up though!!) Then I drew around Lady Macbeth with the black Sharpie as well.
If you click on the image to get a closer look, you will see the cool textures from the two colour crackle!

Tuesday, February 10, 2009

lamplight


This is a drawing/painting done on canvas primed with black gesso. I drew the image first with white pencil. Then I painted in the metallic colours with my fingers using acrylic paints (gold, silver, copper). I then added defintion with pastel pencils and coloured graphite pencils.
This was just a quick fun piece of artwork that I did from a photo of a lamp at an experimental art workshop. I LOVED using my fingers to paint the metallic paint. It felt more expressive than using a brush!

Tuesday, December 9, 2008

alphabet soup


This is a mixed media piece I did for the "Scavenger Project" an art project organised by Art House Coop. The prompt they gave was "alphabet soup" and this was my response.

It is a mixed media art work on a vintage book page. I drew with pencil and painted with acrylics. The words have been written with white souffle pen.

The words are imaginary dialogue I wrote using the story that was on the vintage book page. The key words are in the soup in the ladle. I enjoyed doing this page. It was nice to do some drawing and painting again rather than collage. I liked the old page and the text as a background to start from and the double prompt of the words on the page as well as the prompt from Art House Coop.

I am interested to see whether any of my submissions will be printed in the "scavenger project" book, but it is not due out till next year, so I will just have to wait!!

Tuesday, November 11, 2008

thief!!


This strange little fella was spotted nicking off with an expensive piece of jewelry! He buzzed through the room and out the window and everyone there thought it was just a willy willy blowing through. This high speed camera just happened to catch the guilty culprit redhanded.
This is a page in a journal. It is a mixed media piece with pages from a vintage book in the background. Then I coloured the background with watersoluble crayons and acrylic paint. Then I collaged on the images of the man, the ring and the wings. I used a white pen marker to do the feathers on the wings and outlined the figure with black fineline pen.
If you look carefully, you will see the woman that the ring was stolen from in the picture. And she is wearing the very same ring!
Can't find her? Take a close look at the wings!!

Wednesday, October 22, 2008

riding the highs and lows of life


This is a journal page with a host of ephemera underneath. There is a bad lotto ticket, courier stickers, magazine cuttings, stamp, Starbuck's pamphlet, etc. I painted over them all with acrylic paint leaving little bits to peek through, then I drew over the page with sharpies.
This isn't the entire page because my scanner isn't quite big enough for the journal that I am using! I keep saying to myself that I will keep my art smaller on the page when I do it...but I never remember.
I am busy working at the moment, but I am trying to keep my creativity going with little snatches of art. It is a long weekend here in Hawkes Bay this weekend. We have Friday off for Hawkes Bay day and Monday off for Labour Day, and it is the tradition in our family to go along to the Hawkes Bay A&P Show (Agricultural and Pastoral!!). We will walk and walk and walk around hundreds of exhibits (when hardly any of them really interest us!), we will watch the kids on the side show rides (and watch our money ride off with them!), we will eat hotdogs and candyfloss, and we will get sunburn even though we drench ourselves in cancer society sunscreen lotion. Aaaaaah! And yet I am looking forward to it as usual!!
I will take my camera with me and try and get some shots (even if they are just arty ones!) to put up on my blog.
If I am lucky I will get some time for some art on the weekend too!!!!!!!!

Monday, October 6, 2008

illustration friday "sugary"


Yes!! I'm back! I managed to get an Illustration Friday drawing done before the week had finished! I have had lots of ideas for the other weeks, but never got the chance to do them. Well this time I got my brain thinking hard straight away and I did it!


This is done on a new brown paper journal that I bought from a local bookshop. I loved the brown paper, and I thought that it would be something different to draw on (if the mood struck me to draw on something different!) (and it did!)
The process is just pencil on brown paper, acrylic paint, and souffle pen for the colour on the lollipop.

Saturday, October 4, 2008

Beckon

This is an acrylic painting on board. I used artist quality acrylic paint as well as "Jo Sonja's Artist's Gouache Iridescent" paint over the white dress. I haven't finished the eyes completely yet, but who knows when I will get around to finishing them! So I thought I would post some more traditional painting on my blog.
This is my first painting of a person. I had drawn people before, but never painted them. I used a photo of a relative as a guide.

These are close ups of two areas to show the types of texture techniques that I have used. Can't think of anything else to say! Gosh!! I am so boring at writing in my blog!!

Saturday, September 27, 2008

Angel


I just adore angels! This angel is a photo I took of a memorial statue at a cemetery. I posterized the image and superimposed it on the image of the wall of a room being renovated. I printed the image out and then collaged it in my journal with snippets of sheet music and old dictionary pages. The colour around the edges is watercolour crayons, the circles are souffle pen and the dotted lines are acrylic paint.

Enjoy this image! I will post some of my angel photos on another day. You are bound to see many more angel images in the future. They are just heavenly. Compassion personified.

Friday, September 19, 2008

For Sleep or Death


I was trying to portray a more solemn feeling with this page. I haven't got the hang of the collaging the way I would like to at the moment, but instead I just went with my flow to see what would result. The poem by Ruth Pitter gave the feeling that I wanted and the collaged images underneath are pages from a vintage children's book about life for Victorian children. The woman is from a Dover Clipart book. I drew the line of washing and the hooded figure. The colour was a dilute wash of muddy green acrylic to start with then coloured pencils and coloured graphite on top. The words and the poetry were written with souffle pen and I went around the words of the poem again with coloured pencil.

It's not dramatic like other people's journal pages, but it contains the more sombre elements I wanted, and that is good enough for me!!

Tuesday, September 9, 2008

Bright and bold and brassy!!!


Finished a new journal page, first page of the journal chronologically. It had the gorgeous picture of the bunny on it that I had to keep intact! She is rushing away in such a determined manner - I just love her.

Credits for this page are due! I followed Ricë Freeman-Zachery's suggestion to use a photocopied image of myself on the page http://voodoonotes.blogspot.com/2008/09/part-ii-art-journal-page-backgrounds.html . Have decided to get my son to take a pile of photographs of me with all different expressions, which I will print a pile of each of them out all ready to go. Then I will just pick the expression I want for the page I am doing at the time! Thanks Ricë!

The other credit is to Suzan Buckner and her suggestions on how to create a journal page with colour and collage http://thriftycollageartist.blogspot.com/2008/02/step-by-step-instructions-to-jouranl.html . It helped me look at the edges of the page as a frame for the writing in the middle, encouraged me to go for bright colours, and made me try highlighters. Thanks Suzan!

The process was: collaged pages of penpal letters and vintage book page, acrylic paint washes, stickers, highlighter, gel pen, felt pens, soffle pens. I just kept going till I felt it looked balanced enough. The felt pen writing is a bit heavy, that's because I need to go and buy some sharpies. This was the only felt pen I had in the house that would write over the underlayers. Hoping to buy some today!

Very bright colours, and busy, but I like it!

Friday, September 5, 2008

Dance


This is a page in the art journal I have started. The photo is of me in my teenage dancing days. The process was glued in a vintage ballet book page, painted over acrylic paints with a brayer, fixed on photo printed on transparency, freehand lettering done in souffle pen.
I can't believe I actually finished a page!!! Mind you I haven't journalled on it yet. Maybe tomorrow!